Introduction
The National Pension System is a great financial product for creating your
retirement kitty. With contribution of just ₹5000 per month, you can
accumulate more than a crore! I am a NPS subscriber (through NSDL eNPS)
myself. If you have read my
previous post regarding EPF you know I like NPS for the following reasons.
- 60 year lock-in period
- Additional tax exemption under section 80CCD (1B)
- Choice of various assets classes
- Choice of pension fund managers
- Option to change your asset allocation or pension fund manager
- Low cost of fund management
- Transparency & organization structure
- Good customer support
- Online account opening and management
- Multiple exit options at retirement

|
| Screenshot from Pension Calculator | NPS Trust |
Some Not So Great Things
NPS is far from perfect though. Following are some of the things that annoy me the most.- It takes a long time (at least 2 days) for your contributions to get credited to your account
- It's mandatory to buy an annuity plan at retirement*
- NSDL's NPS web app and mobile apps are very old school
On 12 May 2020, PFRDA (the regulator for NPS), announced the D-Remit or Direct Remittance feature. And on 1st October 2020, the feature was made public. This was the best change to NPS since it was opened to the organized sector! With this, PFRDA has solved issue #1 mentioned above.
Steps to Automate Your Contributions
The steps are a bit involved than I would have liked. But it's better than
nothing! Here's your step by step guide.
-
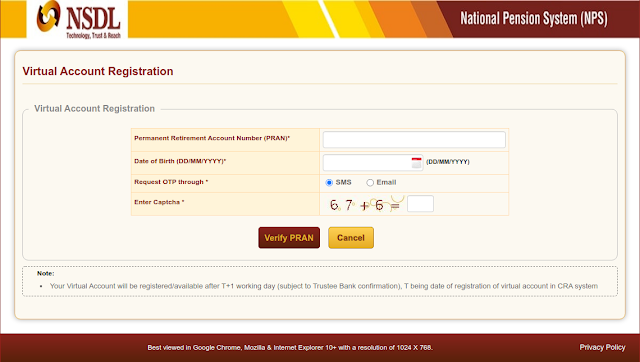
You need to create Virtual Account Numbers for your PRAN. You can do so by
visiting the Virtual Account Creation page. You'll get 2 different numbers for your Tier 1 and Tier 2
accounts.
-
Follow the steps on the screens. Your account creation request will be
accepted and you'll get confirmations via email and SMS.

Pro Tip: If you get an error message saying "System exception occurred, Please contact to Admin", open the web page in a private window.
-
After a day you'll get your Virtual Account Number through email. The email will also include other details needed to setup a standing instruction.

-
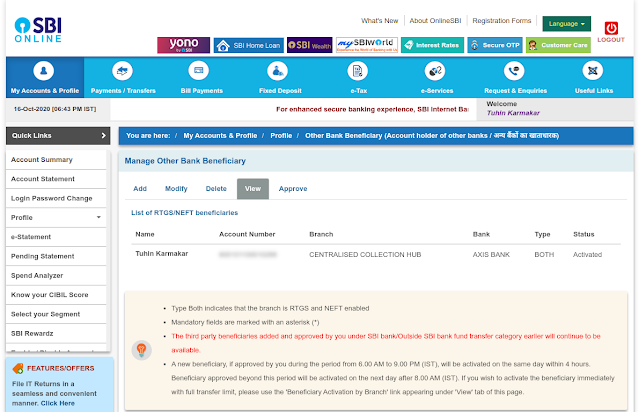
Now you have to visit your bank's website and add a NEFT beneficiary with the details received in the email.
-
After the beneficiary gets activated, you can go on to create a standing instructions. Here I have created a standing instruction of ₹1000 that will get executed every week.
It is recommended that you the write the purpose as "NPS contribution for D-Remit".


Conclusion
With these steps, you can utilize the D Remit facility and get the NAV of
the same day! And best of all, it's free cost cost.
There is just one catch... As of now, you'll get the NAV of the same day
only if the your virtual account is credited before 08:30 A.M. If the amount
is transferred after 08:30 A.M., you'll get the NAV of the next day. That's
better than 2 weeks I guess! Congratulations now you have your NPS
contributions on autopilot.
* I have changed my views on this point since the original publication of the post.
Nice read ~!
ReplyDelete